Quick Start Guide
Before you do the following steps you need to create a test account and agree to the API Terms of Service; the instructions for this are here. In order to use the test system you will need to follow the instructions described here.
Step 1. Create the Document
Use the POST documents function to upload your document and retrieve the document id which will be used to submit the mailing.
The document id can be reused if you wish to mail the document again.
Step 2. Create the Address List
In this step you will create an address list to be used in your mailing. This is required whether you are mailing to a single address or to multiple addresses.
Here you must make a choice. You can either use our standard address template and Mapping ID or you can use a custom address template and mapping.
Whether you use the standard address template or a custom template that you create in your account you must consistently use all the column names for each address whether they contain data or not.
Standard Address Template.
The standard address template is downloadable here.
The POST addressLists function will be used to define the address list. You will use the column names from the address template and a mapping id of 2.
The addressLists function will CASS certify your address list and store the list in your account. You must wait for this to complete before continuing.
The GET addressLists/id function is used to poll the system for the completion of the address list creation. It is recommended that you check every 10 seconds for this process to complete if you are using a large list, less if it is a single address. Once the call returns a status of 5 you may proceed to the next step.
The address id can be reused if you wish to mail with the same list again.
Custom Address Template.
The address list template is a mapping of the data columns that you declare in the POST addressLists function to map the address block on your document. As long as you use the same format every time you will only need to do this once.
The first step is to create a spreadsheet with column headings that match the data names you will be using in the POST addressLists function. Add to the spreadsheet at least one sample address. Save the spreadsheet as a comma separated file (CSV).
The POST addressLists function will CASS certify your address list and store the list in your account. You must wait for this to complete before continuing.
The GET addressLists/id function is used to poll the system for the completion of the address list creation. It is recommended that you check every 10 seconds for this process to complete if you are using a large list, less if it is a single address. Once the call returns a status of 5 you may proceed to the next step.
The address id can be reused if you wish to mail with the same list again.
**Step 3. Create Job **
The POST jobs will associate a document and address list with the mailing options you desire. Optionally you may override the return address used when creating the job template if you wish to vary the return address. Upon successful completion you will receive back a job id for the mailing.
Instructions
Product selection and print production
The allowed combination of options depends on the product you wish to mail. To determine the options, you will need to use the Click2Mail MOL Pro Product Selector. This is located at https://click2mail.com/by-service/mol-pro-api. Select the product you wish to mail and press Start Here. This will bring up the product options selector. Select the options you wish to use and the names of the options are the values for the printProductionOptions.
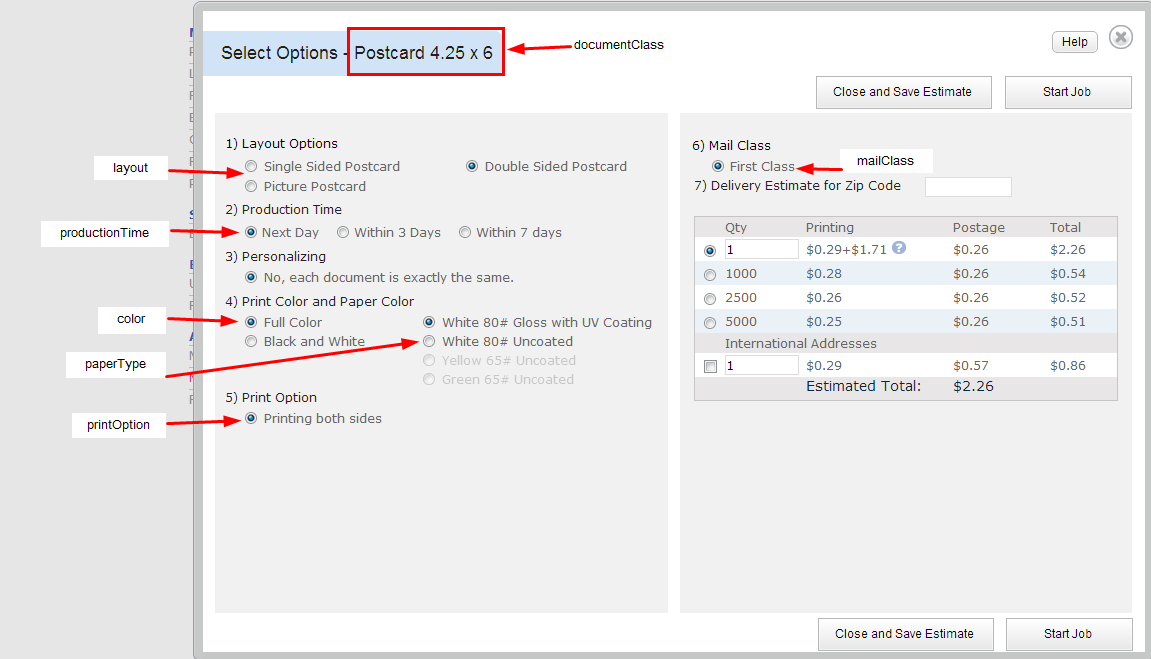
For example if I want to mail a 4 x 6 Postcard:

So if you take the words for the options from the product selector you will have the correct options for your mailing. In this case the production options will be:
documentClass = "Postcard 4.25 x 6"
layout = "Double Sided Postcard"
productionTime = "Next Day"
envelope = ""
color = "Full Color"
paperType = "White 80# Gloss with UV Coating"
printOption = "Printing both sides"
mailClass = "First Class"
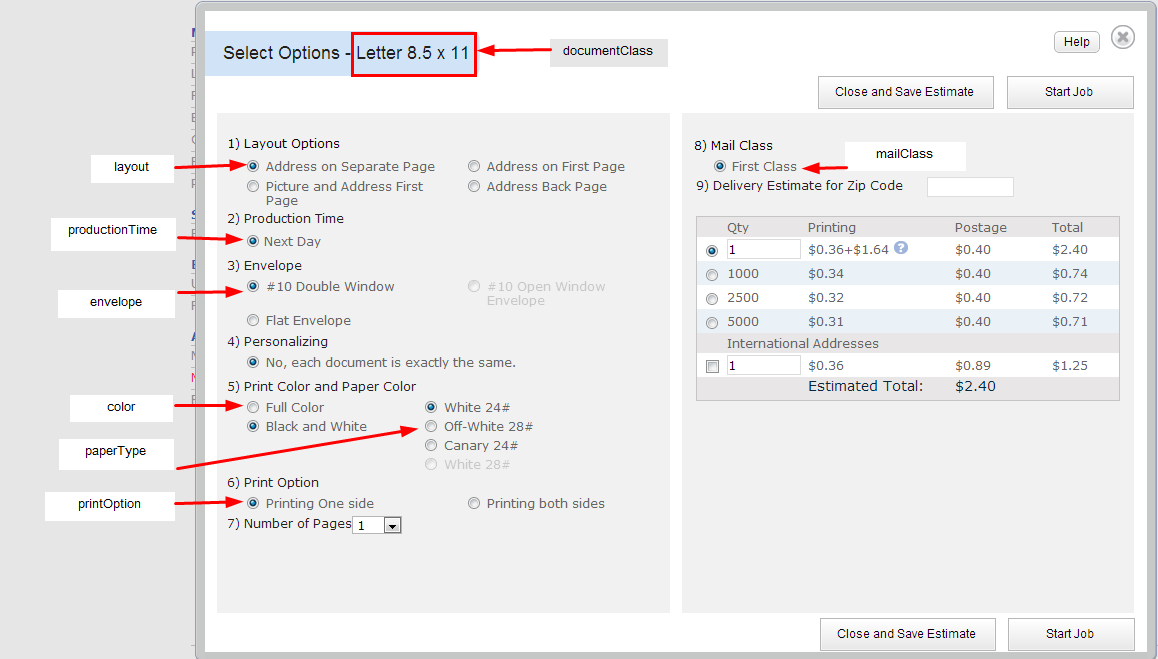
For example if I want to mail an 8.5 x 11 Letter:

So if you take the words for the options from the product selector you will have the correct options for your mailing. In this case the product options will be:
documentClass = "Letter 8.5 x 11"
layout = "Address on Separate Page"
productionTime = "Next Day"
envelope = "#10 Double Window"
color = "Black and White"
paperType = "White 24#"
printOption = "Printing One side"
mailClass = "First Class"
Document selection
The document that is mailed can be any document that has been previously uploaded into your account. Simply place the ID of the document in the documentId parameter.
Mailing List selection
The mailing list used in the job can be any mailing list that has been previously uploaded into your account. Simply place the ID of the mailing list in the addressId parameter.
Return address
If you do not specify the parameters the system will use the default return address in your account. You may not use a non-USA return address. If you do we will replace the return address with our P.O Box. You may arrange in advance for returned mail to be scanned and returned to you for a fee.
- Endorsement *
The default for this is no endorsement. If you do not select an endorsement service we will automatically run NCOA change of address service on all mailing addresses and automatically update the address. If you request an endorsement service NCOA will not be run and the USPS will perform the requested service. The primary difference between these two services is that Address service will notify the sender if the mail piece is forwarded or returned and the Forwarding service will notify the sender only if the mail piece is returned. Please refer to the USPS document, Quick Service Guide 507, for more detailed information.
The possible values are:
- Address Service Requested
- Forwarding Service Requested
**Step 4. Submit the Job for Processing **
Using the POST jobs/ID/submit call you will specify the payment options and job id of the job you wish to submit for processing. Upon acceptance of payment you will receive back a successful response and the job will be processed.